The following information provides best practices for using QA Wizard Pro to automate your functional and regression testing process. Implementing these practices can help you avoid common mistakes and improve the quality of your automated tests.
This information applies to any web, Windows, or Java application. To understand these best practices, you should be familiar with key QA Wizard Pro concepts. It is also helpful to have a basic understanding of the test application and the toolkit or technology used to develop it in case you need to troubleshoot problems with your tests.
Keep in mind that your organization and the applications you are testing may require a unique solution. We recommend customized training to make sure you set up and use QA Wizard Pro most effectively. Contact Perforce Sales for information.
Application maintenance
The following information can help you properly set up and maintain QA Wizard Pro application repositories.
Whether you are the only user testing an application or you are adding a new application to promote to the global repository for sharing with other team members, always take the time to properly set up the local application repository first. This helps you understand how QA Wizard Pro captures information in the application you are testing and fine tune the repository data to prevent mistakes later.
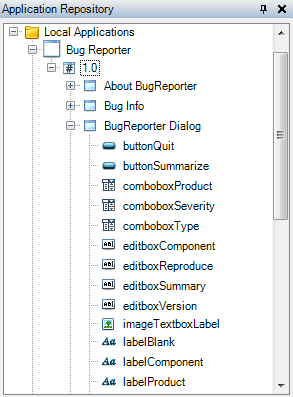
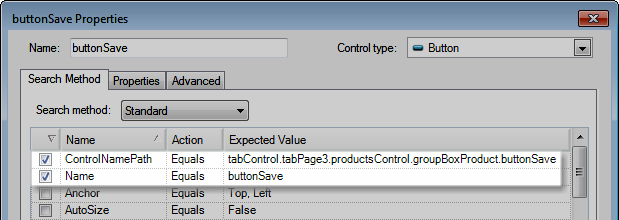
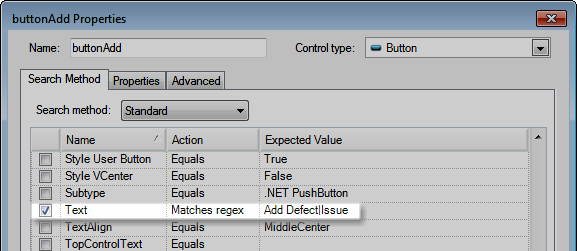
Record scripts for each major area of the application to add the windows, controls, and their properties to the repository. You can also populate the repository if you do not want to create new scripts. Carefully review the repository data and make any changes to control names and search criteria. Continue checking the data until you are sure all windows and controls you need to test or verify are in the repository and can be located by QA Wizard Pro when running tests.
After the repository is set up, you can start running actual tests. If you need to share the application with others, promote the local application to the global repository.
Using an intuitive and consistent control naming convention helps keep the application repository organized. There are no rules or requirements for naming controls, but it is important to always use a naming format that clearly identifies controls so you can easily find them in the repository. This is especially helpful if your team uses a global repository or you export a local application to share it with someone.
Windows and controls are displayed alphabetically in the repository with controls grouped under the window they are included in. This organization may impact how you choose to name controls. After recording a script or populating the repository, QA Wizard Pro suggests names in the Repository Changes dialog box based on captured property values for new windows and controls. Choose or enter a name that clearly identifies the controls in the repository and is consistent with other controls of the same type in the application.
You can also rename existing windows and controls in the repository to use the naming convention used to group similar controls. In the following example, all controls on the BugReporter Dialog window have names that start with the control type, such as button and combobox. Controls of the same type are grouped together under the window in the repository.
Tip: If you have a naming format preference different from the default convention QA Wizard Pro uses, you can override naming conventions so new controls added to the repository automatically use your format.
If QA Wizard Pro cannot recognize the type of a control during recording, it is added to the application repository as a generic control. Many statements can only be used with supported controls. If you need to perform specific actions on a generic control, change the type in the control properties to a more accurate type that supports those actions.
In the following example, a generic control that you enter text in is changed to an edit box. After updating the control type, you can use object action statements in scripts, such as SetText, to interact with it.
QA Wizard Pro automatically selects a set of properties and expected values for each control. This information is saved in the application repository and used to uniquely identify windows and controls during recording and playback. If warnings or errors occur during playback because an action was performed on an incorrect control, adjust the search criteria for that control to distinguish it from other controls. You may also need to update search criteria if you notice an existing control is added to the repository multiple times to make it easier to identify during subsequent recordings.
You can view or update search criteria for windows and controls in the Properties dialog box. Check marks indicate the properties used as search criteria. In the following example, the ControlNamePath and Name properties are the search criteria for the buttonSave control.
Defining unique search criteria requires a good understanding of the test application and toolkit or third-party technology used to develop it. Discuss the control properties and expected values used as search criteria and any problems you are experiencing with the application developer to see if you can determine better search criteria.
Keep the following in mind when evaluating and modifying search criteria:
Test maintenance
The following information can help you efficiently manage and maintain your automated tests in QA Wizard Pro.
Workspaces can quickly become very large as you add new scripts and other test files to them. To stay organized, use folders to group related files so they are always easy to find. Consider grouping files in the same folder if they are the same type or related to individual tests in a test suite. Keep in mind that folders are flexible to use in any way that makes sense for your testing scenario.
The following example shows how folders group different file types: test case scripts, utility scripts called by other scripts, output files, datasheets, and batch files.
Large scripts that perform all actions for a test scenario are difficult to debug and maintain. Smaller scripts are easier to understand and manage. Keep each script focused on an individual task or test case. If you need to create a more complex script that performs multiple tasks, use the CallScript statement to combine scripts and perform the tasks in the same test.
For example, if you are testing a customer relationship management application, create an individual script for each task: adding customers, creating invoices, canceling invoices, and updating contact information. After setting up these scripts, create another script that calls all the other scripts to run the entire regression test suite.
The following example shows a script that runs an entire test suite.
It is also helpful to use separate utility scripts with steps that perform common actions in your application, such as logging in and out. You can call these scripts from other scripts to reuse actions in different tests, which eliminates maintaining the same steps in multiple scripts. For example, create one script that logs in to the application and another script that logs out. Other scripts can call these scripts during playback to log in and out. If the application changes or you encounter problems with the called script, you only need to make changes in that script to update all tests.
Scripts with fewer steps are easier to understand. After recording scripts, delete any unnecessary steps to keep scripts smaller and more streamlined. This can help you focus only on the steps that need attention when modifying or debugging scripts.
Typically, you can delete steps that select fields or move the cursor to another field. For example, if you press the Tab key to move the cursor from one edit box to another, a KeyPress statement is added to the script. This statement is not needed when running the script and can be deleted without affecting playback.
You can also use outline blocks to group sets of related steps, which makes longer scripts easier to read. Outline blocks collapse to show only the first line in the group of steps. Make the first line in the block a comment to explain what the steps in the group do.
In the following example, steps that reset values in fields before closing the application are grouped in a collapsed outline block. A comment explains what the steps in the block do.
Use data-driven scripts to run multiple iterations of the same test from one script. Instead of using hard-coded data values, these scripts run repeatedly using different sets of data from associated datasheets, which are separate files that only store test data. Maintaining test data separately from scripts makes it easier to use more data to improve test coverage, share data with multiple scripts, and update data without needing to modify scripts.
Before creating data-driven scripts, determine if you need to use local or external datasheets. In some scenarios, you may need both.
To use the test data in scripts, associate datasheets with them. Set a datasheet as the data source for a script to run the entire script once for each row in the datasheet. Use datasheet statements for more advanced scenarios. These statements let you run scripts using a subset of data from a datasheet and pull data from multiple datasheets into the same script.
In the following example, datasheet statements open the WysiCRM Contacts datasheet and set the values in the WysiCorp CRMContact form fields. The script loops through all rows in the datasheet and adds a contact for each data set before moving to the next step.
Sharing scripts and other test files with other team members on network drives makes it difficult to keep track of changes. It can also prevent others from accessing files they need if another user has them locked for editing. Instead, store scripts and shared test files in Surround SCM or another source control tool to give all team members easy access to testing assets from a central location.
Integrating source control into your testing process ensures files are securely backed up and the most recent script and test file versions are available without affecting other tests. It also helps you maintain a historical record of file changes, including what content changed between versions and who made the change, and lets you to revert back to a previous version when needed.
You can configure Surround SCM integration to perform source control actions directly from QA Wizard Pro, such as getting current scripts and other test files, checking out files to modify them, and checking in changes. This makes it easy to work with files under source control without switching to Surround SCM.
After creating and debugging regression test scripts, add them, any associated datasheets, and other files required for the tests to a batch file. Batch files are executables you can use to run scheduled regression tests that do not require a team member to start or monitor them. You can also include batch files in a continuous build process to automatically run regression tests as part of a routine build. This saves time and gives team members availability to focus other testing tasks.